During restart an Informix updateable secondary server (either HDR or RSS) may spend a significant amount of time in the 'fast recovery' mode before it becomes available for SQL execution. In this scenario the data replication subsystem generates following message in the message log:
'Started processing open transactions on secondary during startup'.
Question is why does it happen?
Answer
The locks on secondary server are created by recovery threads while replaying logical log records. A secondary server does not able to create the locks when it restarted and at the same time there are open transactions being processed on the primary server, unless it replayed the log records prior to the initial checkpoint. The updateable secondary server must be kept in the recovery mode until all such prior open transactions are completed in order to maintain the ‘committed read last committed’ isolation level.
You can find open transactions in 'onstat -x' output, which prevent secondary server from going out of 'fast recovery' mode. Following is an example of 'onstat -x' output:
In the above output the 'begin_logpos' value for the highlighted transaction is '124:0x0' (where 124 is the logical log number, and 0x0 represents offset into the logical log). The simpler reason of offset '0x0' is secondary server does not know the transaction begin address since it restarted. Therefore, the secondary server will remain in 'fast recovery' mode (however the data replication is continue working) until that transaction is committed or rolled back on the primary server.
on the primary server you can find the open transaction by running onstat -x and grep for the current logpos shown in the secondary:
onstat -x | grep 124:0x2ef018
on the primary you can find the user and session id by running onstat -u and grep for associated userthread obtained from previous onstat -x output:
onstat -u | grep userthread
After some investigation of the session ( onstat -g ses sid ) you might determine it is OK to kill this session so the secondary can complete fast recovery:
기업 내 다양한 업무를 신속하게 처리하는 데 있어 데이터베이스 시스템의 장애로 인해 특정 중요 테이블의 긴급 복구를 해야 할 필요가 있습니다. 물리적인 장애로 인해 테이블의 데이터를 이용하지 못하는 경우도 있고, 사용자의 실수로 인해 특정 테이블의 데이터의 손실을 유발할 수 있습니다.
IBM Informix Dynamic server 10.0에서는 archecker 유틸리티를 사용하여 보관으로부터 특정 테이블을 복구할 수 있습니다. 복구하려는 테이블은 특정 시점까지 복원할 수 있고, 특정 범위의 데이터만 찾아 복원할 수 있습니다. 이를 사용하면 전체 보관의 복원을 수행하지 않고 데이터의 특정 조각을 복원할 수 있습니다.
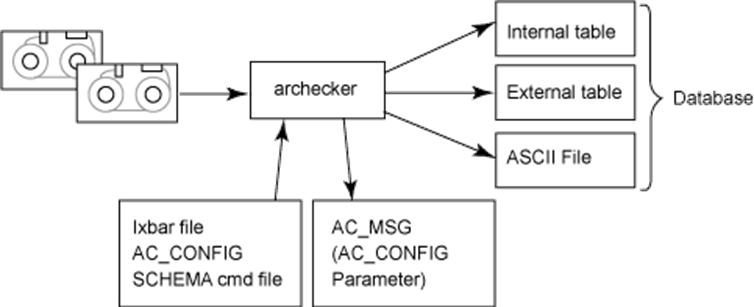
Figure 1. Overview of archecker utility
사전 작업
TSM 또는 ISM을 이용하여 onbar backup을 받을 수 있는 환경을 만들어 놓습니다.
환경 설정
IDS v10에서 테이블 단위의 복구 기능을 사용하려면 archecker라는 유틸리티를 사용합니다. Archecker를 실행하기 위해 몇 가지 설정을 해야 하는 데, 인포믹스 사용자 환경과 archecker가 실행될 때 복구 범위를 참조해야 할 커맨드 파일을 작성해야 합니다.
환경변수 AC_CONFIG를 사용하여 archecker의 설정 파일의 경로를 지정합니다. onCONFIG와 마찬가지로 $INFORMIXDIR/etc/ac_config.std를 복사해서 설정 파일로 사용합니다.
현재 설치된 IDS의 환경에 맞게 AC_CONFIG에 지정된 파일을 수정합니다. AC_SCHEMA는 archecker 실행시 참조하는 커맨드 파일의 경로를 지정하는 데, 이후 ?f 옵션을 사용하여 커맨드 파일을 읽을 때는 이 값은 무시됩니다. AC_IXBAR는 onbar 백업을 받을 때 생성되는 ‘ixbar.인포믹스 서버번호’ 을 지정합니다.
[ cmdfile1.cmd ]
database stores7;
create table customer
  (
    customer_num serial not null ,
    fname char(15),
    lname char(15),
    company char(20),
    address1 char(20),
    address2 char(20),
    city char(15),
    state char(2),
    zipcode char(5),
    phone char(18),
    primary key (customer_num)
  ) in datadbs;
insert into customer select * from customer;
restore to '2006-03-24 21:10:08';
커맨드 파일의 작성이 끝나면 다음과 같은 명령어를 실행합니다.
# archecker -bvs -f /informix/ARCH/cmdfile1.cmd
IBM Informix Dynamic Server Version 10.00.UC4
Program Name:   archecker
Version:        8.0
Released:       2005-11-18 22:22:21
CSDK:           IBM Informix CSDK Version 2.90
ESQL:           IBM Informix-ESQL Version 2.90.UC1
Compiled:       11/18/05 22:23  on Linux 2.4.21-27.0.2.ELsmp #1 SMP Wed Jan 12 23:35:44 EST 2005
AC_STORAGE               /tmp
AC_MSGPATH               /informix/ac_msg.log
AC_VERBOSE               on
AC_TAPEBLOCK             62 KB
AC_IXBAR                 /informix/etc/ixbar.0
Dropping old log control tables
Extracting table stores7:customer into stores7:customer
Scan PASSED
Control page checks PASSED
Table checks PASSED
Table extraction commands 1
Tables found on archive 1
LOADED: stores7:customer produced 28 rows.
Creating log control tables
Staging Log 48
Logically recovered stores7:customer Inserted 0 Deleted 0 Updated 0
실행이 완료되면 데이터를 확인합니다. Customer 테이블이 생성되며 데이터가 로딩됩니다. # dbaccess stores7 - Database selected. > select count(*) from customer; (count(*)) 28 1 row(s) retrieved.
시나리오 2. 다른 테이블로 복구
운영 중인 데이터베이스 내 테이블의 특정 데이터를 실수로 삭제를 했을 경우, 현재 테이블은 보존하면서 다른 이름의 테이블을 생성하여 데이터를 복원할 수 있습니다.
delete from customer where customer_num > 120;
다음과 같이 커맨드 파일을 작성하세요. 이때 원본 테이블 이름과 다른 테이블 이름을 지정하세요.
--cmdfile2.cmd
database stores7;
create table customer
  (
    customer_num serial not null ,
    fname char(15),
    lname char(15),
    company char(20),
    address1 char(20),
    address2 char(20),
    city char(15),
    state char(2),
    zipcode char(5),
    phone char(18),
    primary key (customer_num)
  ) in datadbs;
create table customer2
  (
    customer_num serial not null ,
    fname char(15),
    lname char(15),
    company char(20),
    address1 char(20),
    address2 char(20),
    city char(15),
    state char(2),
    zipcode char(5),
    phone char(18),
    primary key (customer_num)
  ) in datadbs;
insert into customer2 select * from customer;
restore to '2006-03-24 21:10:08';
커맨드 파일의 편집이 끝나면 다음과 같은 명령어를 실행합니다. # archecker -bvs -f /informix/ARCH/cmdfile2.cmd
실행이 완료되면 데이터를 확인합니다. Customer2 테이블이 생성되며 customer 테이블의 데이터가 customer2 테이블로 로딩됩니다. 이때 customer 테이블에서 삭제된 데이터를 customer2 테이블에서 확인할 수 있습니다.
# dbaccess stores7 - Database selected. > select count(*) from customer2 where customer_num > 120;
(count(*)) 8 1 row(s) retrieved.
시나리오 3. 데이터 필터링 후 복구
DBA가 테이블 내 특정 시점의 특정 테이터 만 선별하여 복구하려 합니다. 다음과 같이 커맨드 파일을 작성하며, 이때 물리 복구만을 해야하며 ‘no log restore’ 옵션을 추가해야 합니다.
--cmdfile3.cmd
database stores7;
create table customer
  (
    customer_num serial not null ,
    fname char(15),
    lname char(15),
    company char(20),
    address1 char(20),
    address2 char(20),
    city char(15),
    state char(2),
    zipcode char(5),
    phone char(18),
    primary key (customer_num)
  ) in datadbs;
create table customer3
  (
    customer_num serial not null ,
    fname char(15),
    lname char(15),
    company char(20),
    address1 char(20),
    address2 char(20),
    city char(15),
    state char(2),
    zipcode char(5),
    phone char(18),
    primary key (customer_num)
  ) in datadbs;
insert into customer3 select fname,lname from customer where customer_num > 120;
restore to '2006-03-24 21:10:08’
no log restore;
커맨드 파일의 편집이 끝나면 다음과 같은 명령어를 실행합니다. # archecker -bvs -f /informix/ARCH/cmdfile3.cmd
실행이 완료되면 데이터를 확인합니다.
# dbaccess stores7 - Database selected. > select count(*) from customer3 where customer_num > 120;
(count(*)) 8 1 row(s) retrieved.
시나리오 4. ASCII 데이터 파일로 테이블 복구
백업 디바이스 내에 백업된 테이블 데이터를 데이터베이스 내의 테이블이 아닌 ASCII의 파일 형태로 복구하려고 합니다. 다음과 같이 커맨드 파일을 작성하며, ‘external’로 표시되는 가상의 타겟 테이블을 정의해야 합니다.
--cmdfile4.cmd
database stores7;
create table customer
  (
    customer_num serial not null ,
    fname char(15),
    lname char(15),
    company char(20),
    address1 char(20),
    address2 char(20),
    city char(15),
    state char(2),
    zipcode char(5),
    phone char(18),
    primary key (customer_num)
  ) in datadbs;
create external table customer4
  (
    customer_num serial not null ,
    fname char(15),
    lname char(15),
    company char(20),
    address1 char(20),
    address2 char(20),
    city char(15),
    state char(2),
    zipcode char(5),
    phone char(18)
  ) using ('/tmp/customer.unl',delimited);
insert into customer4 select * from customer;
restore to '2006-03-24 21:10:08’ no log restore;
커맨드 파일의 편집이 끝나면 다음과 같은 명령어를 실행합니다. # archecker -bvs -f cmdfile4.cmd
customer 테이블의 데이터를 추출하여 “|”를 구분자로 customer.unl 데이터 파일을 생성합니다. 실제 customer.unl 파일이 생성되었는지 확인하십시오.