728x90

listener-thread: err = -27001: oserr = 0: errstr = : Read error occurred during connection attempt.


에러가 발생하는 경우


  1)  onconfig 에 설정되어 있는  poll thread 가 담당하는  connection 수가 부족한 경우에 에러가 날수

       있습니다. onconfig NETTYPE 설정을 변경하여 해결할수 있습니다.

   ) NETTYPE soctcp,<num pollthreads>,<num connections per pollthread>,CPU

        권장값 :  <num pollthreads> = NUMCPUVPS -1

        권장값 : <num connections per pollthread> = up to 250 or 300 for best performance

             NETTYPE tlitcp,1,100,NET # supports 100 connections : 1 * 100

        ==>  NETTYPE tlitcp,1,200,NET # supports 200 connections   : 1 * 200

  값이 설정되어 있지 않으면   default 값이  50 입니다. 현재 어떻게 설정되어 있는 지는 모르겠으나 지금

  설정되어 있는 값보다  크게 설정하십시요. 이 값의 재 설정 후에는 DB 를 재기동 하셔야 반영됩니다.


  2) 또 하는  OS   file descriptor  가 부족할 경우입니다. DB 단에서는  각 인스턴스 별로 chunk  갯수,

      VP 의 수, network connection 수 등의 값등이 OS file descriptor 자원을 필요로 합니다.

      값이 부족한 경우 로그에  27001 에러가 나면서  connection 이 안되는 경우도 있습니다.

  이 값은  OS Level 에서 조정하여야 하며,  ulimit -a 로 보시면 NFILES 이 갯수를 확인하시고,

  가능하면 무제한(unlimited) 으로 설정하시거나 지금의 값보다 크게 설정하도록 하십시요

728x90
728x90

 ONBARS FUNCTIONAL SPECIFICATIONS

OnBar Operations


Onbar has 5 types of backups: 

  1. Whole System Backups - (onbar -b -w) A whole system backup is indicated with the '-w' flag in the onbar command. When this is set onbar will backup each dbspace serially and such that there will not be any need for logical recovery if a restore is required. A whole system backup will back up every dbspace in the instance.
  2. Dbspace Backups - (onbar -b -L 0 dbsp1 dbsp2 ...) A dbspace backup is when onbar will backup a single dbspace or a group of dbspaces as specified by the argument list passed the the onBar command. If you are backing up multiple dbspaces, then the backups are done in parallel. The amount of backups that can be done at 1 time is restricted to the value of BAR_MAX_BACKUP (see onBar Configuration Parameters). You may also put the list of dbspaces you want to be backed up in the a file and has that file referenced by onBar (see the usage below). If a restore is done utilizing these backups then logical recovery is required to sync up these dbspaces with the other dbspaces.
  3. Logical Log Backups - (onbar -l) onbar will request all logical logs from the engine to be backed up and pass them to the storage manager.
  4. Continous Logical Log Backups - (onbar -C -l ) onbar will start continous logging just like ontape -c
  5. Fake online Backup - (onbar -b -F) onbar will tell the engine to do a 'fake' backup. This is like archiving to /dev/null. This added feature is useful if you want to change the logging mode af a database and do not have the time to perform and archive. NOTE. This does not take the place a regular archive because nothing is sent to the storage manager so nothing can be restored.


Onbar has 6 types of restore options 

  1. Onbar Cold Restore - (onbar -r) When onBar performs a cold restore it first attempts to do a cold log backup (salvage of any logical log that have not yet been backed up. Then onbar will scan the ixbar file to get a list of all objects it needs to restored (ie all level 0, 1, 2 backups of all dbspaces as well as all logical log that will need to be rolled forward). After that onbar simply get one of those objects from the storage manager and passes it to the online engine. once the physical restore is complete, onbar Will automatically start logical recovery and roll forward all logical logs it has.
  2. Onbar Warm Restore - (Onbar -r dbsp2 dbsp3 ...) When onbar performs a warm restore it will first have online back up all the logical so that it can roll forward through them after the physical restore. Next onBar will scan through the sysutils database to get a list of the objects it needs to get from the storage menager. once that is done, onBar will simply get the objects from the storage manager and send then to the engine to be restored. Finally onbar starts retrieving the logical log backups from the Storage Manager and send them to online to be applied as logical recovery.
  3. Mixed restore - Obar can allow the user to perform a mixed restore. This is basically a combinations of both cold and warm restores. The user would first perform a cold restore of the cirtical dbspaces and then a warm restore of the non-critical dbspaces.
  4. Physical restore - (onbar -r -p) As mentioned above onbar will by default start logical recovery after physical recovery has finished. If the user does not want this to happen, he/she can use the '-p' option and onbar will only perform physical recovery. once this is done, online will hang in fast recovery until onmode -m is issued.
  5. Logical recovery - (onbar -r -l) If the user does a physical restore and then wants to perform a logical restore after that, then the user can use the '-l' option to rollforward the logs after the physical restore completes. This can't be done if modifications were done to the database between them time the physical restore completed and the logical restore startted.
  6. Point in Time Recovery - (onbar -r -t {date and time} OR onbar -r -n {log number}) This will allow the user to restore the ENTIRE instance to a specific point in time. That time can be specified by either telling onbar what logical log to rollforward through or by telling onbar the time it is to stop rolling forward. NOTE: The point in time recovery feature is only to be used when performing a cold restore of the entire instance and will NOT work if you want to perform a warm restore of a set of dbspaces.

728x90

'Informix > informix reference' 카테고리의 다른 글

Resident Portion size  (0) 2010.06.01
informix version 확인  (0) 2010.06.01
테이블을 특정 시점으로 복구하는 기능  (0) 2010.05.24
Porting from Oracle to Informix  (0) 2009.12.29
[TIP] embedding SQL in UNIX Script  (0) 2009.12.29
728x90


댓글로 문의를 주신 분이 계셔서 상대 참조를 한번에 절대 참조로 모두 변경하는 방법에 대한 팁을 알려드리겠습니다.  일반적인 메뉴를 통해서 할 수 있는 방법은 없고, VBA를 통한 간단한 프로그래밍을 해줘야 합니다.

엑셀 VBA에는 ConverFomula라고 하는 메쏘드(Method)가 있는데 이것을 활용하면 비교적 쉽게 매크로 작성이 가능합니다. VBA에 익숙하지 않은 분들도 많으신 것 같아 따라하기식으로 진행합니다.

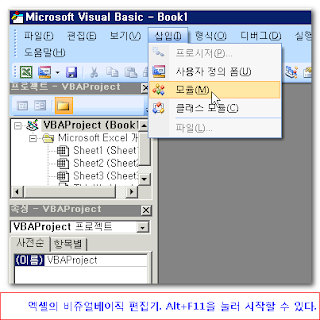
1. 엑셀 통합 문서에서 Alt+F11을 눌러서 비쥬얼 베이직 편집기를 시작합니다. 참고로 MS 오피스의 비쥬얼 베이직 편집기는 MS의 개발 언어 툴인 비쥬얼 베이직을 어플리케이션에서 사용할 수 있도록 제공하는 도구입니다.

2. [삽입-모듈]을 선택해서 새로운 모듈을 삽입합니다.


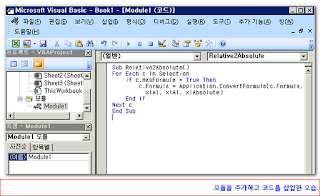
3. 모듈이 삽입되면 아래 코드를 그대로 입력합니다. (복사&붙여넣기) VBA를 조금 공부하신 분들은 금방 이해하실 수 있을겁니다.

Sub Relative2Absolute()
For Each c In Selection
If c.HasFormula = True Then
c.Formula = Application.ConvertFormula(c.Formula, xlA1, xlA1, xlAbsolute)
End If
Next c
End Sub


아래와 같이 모듈의 서브 클래스가 생깁니다.


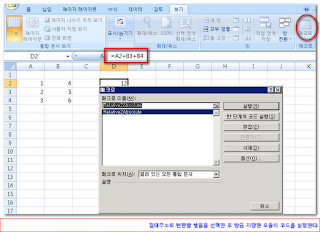
4. 이제 필요한 VBA 프로그래밍이 끝났습니다. VBA 편집기를 닫고 다시 엑셀 통합 문서로 돌아옵니다. 절대주소(참조)를 포함하는 셀들을 모두 선택한 후 [보기-매크로]를 선택합니다. 그 후 매크로 창에서 방금 입력한 서브 클래스를 선택하고 [실행]을 클릭합니다.


* 수식 입력줄을 보면 모든 수식이 상대 참조임을 알 수 있습니다.

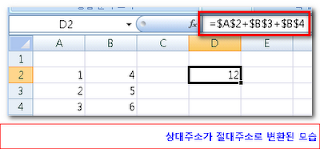
5.아래 그림처럼 선택된 모든 상대 참조 수식들이 절대 참조로 변경됩니다.


생각보다 간단하게 해결이 되죠?

이상 엑셀에서 상대 참조를 절대 참조로 한번에 변경하는 방법에 대해서 알아봤습니다.


출처 : 

http://www.soongin.com/entry/%EC%83%81%EB%8C%80-%EC%B0%B8%EC%A1%B0%EB%A5%BC-%EC%A0%88%EB%8C%80-%EC%B0%B8%EC%A1%B0%EB%A1%9C-%ED%95%9C%EB%B2%88%EC%97%90-%EB%B3%80%EA%B2%BD%ED%95%98%EA%B8%B0

728x90
728x90


난이도 : 초급

김도연, IT Specialist, IBM

2006 년 8 월 28일

기업 내 다양한 업무를 신속하게 처리하는 데 있어 데이터베이스 시스템의 장애로 인해 특정 중요 테이블의 긴급 복구를 해야 할 필요가 있습니다. 물리적인 장애로 인해 테이블의 데이터를 이용하지 못하는 경우도 있고, 사용자의 실수로 인해 특정 테이블의 데이터의 손실을 유발할 수 있습니다.

IBM Informix Dynamic server 10.0에서는 archecker 유틸리티를 사용하여 보관으로부터 특정 테이블을 복구할 수 있습니다. 복구하려는 테이블은 특정 시점까지 복원할 수 있고, 특정 범위의 데이터만 찾아 복원할 수 있습니다. 이를 사용하면 전체 보관의 복원을 수행하지 않고 데이터의 특정 조각을 복원할 수 있습니다.


Figure 1. Overview of archecker utility


사전 작업

TSM 또는 ISM을 이용하여 onbar backup을 받을 수 있는 환경을 만들어 놓습니다.

환경 설정

IDS v10에서 테이블 단위의 복구 기능을 사용하려면 archecker라는 유틸리티를 사용합니다. Archecker를 실행하기 위해 몇 가지 설정을 해야 하는 데, 인포믹스 사용자 환경과 archecker가 실행될 때 복구 범위를 참조해야 할 커맨드 파일을 작성해야 합니다.

환경변수 AC_CONFIG를 사용하여 archecker의 설정 파일의 경로를 지정합니다. onCONFIG와 마찬가지로 $INFORMIXDIR/etc/ac_config.std를 복사해서 설정 파일로 사용합니다.

# cp $INFORMIXDIR/etc/ac_config.std $INFORMIXDIR/etc/ac_config
# export AC_CONFIG=$INFORMIXDIR/etc/ac_config

현재 설치된 IDS의 환경에 맞게 AC_CONFIG에 지정된 파일을 수정합니다. AC_SCHEMA는 archecker 실행시 참조하는 커맨드 파일의 경로를 지정하는 데, 이후 ?f 옵션을 사용하여 커맨드 파일을 읽을 때는 이 값은 무시됩니다. AC_IXBAR는 onbar 백업을 받을 때 생성되는 ‘ixbar.인포믹스 서버번호’ 을 지정합니다.


  # /informix/etc/ac_config
  AC_MSGPATH      /informix/ac_msg.log         	# archecker message log
  AC_STORAGE      /tmp                    	# Directory used for temp storage
  AC_VERBOSE      1                       		# 1 verbose messages 0 terse messages
  AC_SCHEMA       /informix/ARCH/cmdfile
  AC_IXBAR        /informix/etc/ixbar.0


커맨드 파일의 작성

테이블 단위 복구를 위해 다음의 값들을 읽고 복구의 범위를 결정합니다.

  • 소스 테이블
  • 복구 테이블
  • 테이블 스키마
  • 데이터베이스
  • 외부테이블
  • 시점 복구할 테이블

복구 명령어

테이블의 복구 시점을 결정하기 위해 커맨드 파일에 ‘RESTORE TO’ 이후 복구 방법을 표시해야 합니다.

RESTORE TO timestamp : 원하는 시점의 타임 스템프 값(시간)으로 복구
RESTORE TO current : 최근 시점으로 복구
RESTORE TO current no log restore : 0레벨 백업 시점까지의 복구

복구 예제

사전 준비

먼저 0 레벨 백업을 받은 다음 복수 기능 별로 테이블에 데이터를 복원해 보겠습니다. 0 byte 크기의 파일을 생성한 후 dbspace로 등록한 후 stores7 샘플 데이터베이스를 작성합니다.

# touch /informix/DBS/data_chk
# chmod 660 data_chk
# onspaces ?c ?d datadbs ?p /informix/DBS/data_chk ?s 10000 ?o 0
# dbaccessdemo stores7 -dbspace datadbs ?log

샘플 데이터베이스가 완성된 후 onbar를 이용하여 0 레벨 백업을 받습니다.

# onbar ?b

다음 예제들에선 /informix/bar_act.log 파일을 참조하여 0 레벨 백업이 끝난 ‘2006-03-24 21:10:08’ 시점을 기준으로 테이블들을 복원하겠습니다.

 [/informix/bar_act.log]
 2006-03-24 21:10:02 21724  21722 /informix/bin/onbar_d -b
 2006-03-24 21:10:02 21724  21722 Archive started on rootdbs, datadbs, sbdbs (Requested Level 0).
 2006-03-24 21:10:03 21724  21722 Begin level 0 backup rootdbs.
 2006-03-24 21:10:03 21724  21722 Successfully connected to Storage Manager.
 2006-03-24 21:10:03 21724  21722 Completed level 0 backup rootdbs (Storage Manager copy ID: 720324002 0).
                                                 :
                                                 :
 2006-03-24 21:10:07 21724  21722 /informix/bin/onbar_d complete, returning 0 (0x00)
 2006-03-24 21:10:08 21751  21749 /informix/bin/onbar_d -b -l
 2006-03-24 21:10:08 21751  21749 /informix/bin/onbar_d complete, returning 0 (0x00)


시나리오 1. 손실 테이블 복구

DBA가 실수로 고객 테이블을 삭제했다고 가정하겠습니다.

drop table customer;

삭제된 테이블만 복구를 하기 위해 다음과 같이 커맨드 파일을 작성합니다.


[ cmdfile1.cmd ]
database stores7;
create table customer
  (
    customer_num serial not null ,
    fname char(15),
    lname char(15),
    company char(20),
    address1 char(20),
    address2 char(20),
    city char(15),
    state char(2),
    zipcode char(5),
    phone char(18),
    primary key (customer_num)
  ) in datadbs;
insert into customer select * from customer;
restore to '2006-03-24 21:10:08';


커맨드 파일의 작성이 끝나면 다음과 같은 명령어를 실행합니다.


# archecker -bvs -f /informix/ARCH/cmdfile1.cmd
IBM Informix Dynamic Server Version 10.00.UC4
Program Name:   archecker
Version:        8.0
Released:       2005-11-18 22:22:21
CSDK:           IBM Informix CSDK Version 2.90
ESQL:           IBM Informix-ESQL Version 2.90.UC1
Compiled:       11/18/05 22:23  on Linux 2.4.21-27.0.2.ELsmp #1 SMP Wed Jan 12 23:35:44 EST 2005
AC_STORAGE               /tmp
AC_MSGPATH               /informix/ac_msg.log
AC_VERBOSE               on
AC_TAPEBLOCK             62 KB
AC_IXBAR                 /informix/etc/ixbar.0
Dropping old log control tables
Extracting table stores7:customer into stores7:customer
Scan PASSED
Control page checks PASSED
Table checks PASSED
Table extraction commands 1
Tables found on archive 1
LOADED: stores7:customer produced 28 rows.
Creating log control tables
Staging Log 48
Logically recovered stores7:customer Inserted 0 Deleted 0 Updated 0


실행이 완료되면 데이터를 확인합니다. Customer 테이블이 생성되며 데이터가 로딩됩니다. 
# dbaccess stores7 - 
Database selected. 
> select count(*) from customer; 
        (count(*))
                 28
1 row(s) retrieved.

시나리오 2. 다른 테이블로 복구

운영 중인 데이터베이스 내 테이블의 특정 데이터를 실수로 삭제를 했을 경우, 현재 테이블은 보존하면서 다른 이름의 테이블을 생성하여 데이터를 복원할 수 있습니다.

delete from customer where customer_num > 120;

다음과 같이 커맨드 파일을 작성하세요. 이때 원본 테이블 이름과 다른 테이블 이름을 지정하세요.


--cmdfile2.cmd
database stores7;
create table customer
  (
    customer_num serial not null ,
    fname char(15),
    lname char(15),
    company char(20),
    address1 char(20),
    address2 char(20),
    city char(15),
    state char(2),
    zipcode char(5),
    phone char(18),
    primary key (customer_num)
  ) in datadbs;
create table customer2
  (
    customer_num serial not null ,
    fname char(15),
    lname char(15),
    company char(20),
    address1 char(20),
    address2 char(20),
    city char(15),
    state char(2),
    zipcode char(5),
    phone char(18),
    primary key (customer_num)
  ) in datadbs;
insert into customer2 select * from customer;
restore to '2006-03-24 21:10:08';


커맨드 파일의 편집이 끝나면 다음과 같은 명령어를 실행합니다. 
# archecker -bvs -f /informix/ARCH/cmdfile2.cmd

실행이 완료되면 데이터를 확인합니다. Customer2 테이블이 생성되며 customer 테이블의 데이터가 customer2 테이블로 로딩됩니다. 이때 customer 테이블에서 삭제된 데이터를 customer2 테이블에서 확인할 수 있습니다. 

# dbaccess stores7 - 
Database selected.
> select count(*) from customer2 where customer_num > 120;

         (count(*)) 
                 8 
1 row(s) retrieved.

시나리오 3. 데이터 필터링 후 복구

DBA가 테이블 내 특정 시점의 특정 테이터 만 선별하여 복구하려 합니다. 다음과 같이 커맨드 파일을 작성하며, 이때 물리 복구만을 해야하며 ‘no log restore’ 옵션을 추가해야 합니다.


--cmdfile3.cmd
database stores7;
create table customer
  (
    customer_num serial not null ,
    fname char(15),
    lname char(15),
    company char(20),
    address1 char(20),
    address2 char(20),
    city char(15),
    state char(2),
    zipcode char(5),
    phone char(18),
    primary key (customer_num)
  ) in datadbs;
create table customer3
  (
    customer_num serial not null ,
    fname char(15),
    lname char(15),
    company char(20),
    address1 char(20),
    address2 char(20),
    city char(15),
    state char(2),
    zipcode char(5),
    phone char(18),
    primary key (customer_num)
  ) in datadbs;
insert into customer3 select fname,lname from customer where customer_num > 120;
restore to '2006-03-24 21:10:08’
no log restore;


커맨드 파일의 편집이 끝나면 다음과 같은 명령어를 실행합니다. 
# archecker -bvs -f /informix/ARCH/cmdfile3.cmd

실행이 완료되면 데이터를 확인합니다.

# dbaccess stores7 - 
Database selected. 
> select count(*) from customer3 where customer_num > 120; 

        (count(*)) 
                8 
1 row(s) retrieved.

시나리오 4. ASCII 데이터 파일로 테이블 복구

백업 디바이스 내에 백업된 테이블 데이터를 데이터베이스 내의 테이블이 아닌 ASCII의 파일 형태로 복구하려고 합니다. 다음과 같이 커맨드 파일을 작성하며, ‘external’로 표시되는 가상의 타겟 테이블을 정의해야 합니다.


--cmdfile4.cmd
database stores7;
create table customer
  (
    customer_num serial not null ,
    fname char(15),
    lname char(15),
    company char(20),
    address1 char(20),
    address2 char(20),
    city char(15),
    state char(2),
    zipcode char(5),
    phone char(18),
    primary key (customer_num)
  ) in datadbs;
create external table customer4
  (
    customer_num serial not null ,
    fname char(15),
    lname char(15),
    company char(20),
    address1 char(20),
    address2 char(20),
    city char(15),
    state char(2),
    zipcode char(5),
    phone char(18)
  ) using ('/tmp/customer.unl',delimited);
insert into customer4 select * from customer;
restore to '2006-03-24 21:10:08’ no log restore;


커맨드 파일의 편집이 끝나면 다음과 같은 명령어를 실행합니다. 
# archecker -bvs -f cmdfile4.cmd

customer 테이블의 데이터를 추출하여 “|”를 구분자로 customer.unl 데이터 파일을 생성합니다.
실제 customer.unl 파일이 생성되었는지 확인하십시오.

# cat /tmp/customer.unl
101|Ludwig|Pauli|All Sports Supplies|213 Erstwild Court||Sunnyvale|CA|94086|408-789-8075|
102|Carole|Sadler|Sports Spot|785 Geary St||San Francisco|CA|94117|415-822-1289|
103|Philip|Currie|Phil's Sports|654 Poplar|P. O. Box 3498|Palo Alto|CA|94303|415-328-4543|
                                              :
                                                                                            :


위로


참고자료 

       도움말
        IBM Informix Dynamic Server v10.0 Information Center 

       Informix 문서
        Informix 문서
        Informix IBM Informix Backup and Restore Guide 

       제품 얻기
        Informix product family -- How to get Informix product downloads -- IBM Software


728x90

'Informix > informix reference' 카테고리의 다른 글

informix version 확인  (0) 2010.06.01
ONBAR  (0) 2010.05.26
Porting from Oracle to Informix  (0) 2009.12.29
[TIP] embedding SQL in UNIX Script  (0) 2009.12.29
DB size  (0) 2009.12.28
728x90

Oracle 11g에서 많은 새로운 기능들이 생겼습니다.

그러나 oracle 11g를 설치하면 제일 먼저 눈에 띄는게 OFA 구조가 바뀐거죠. 

(설치 후 alert log를 한참동안 찾아 헤메였다는.. ^^;)


전통적으로 oracle alert log file과 trace file들은 $ORACLE_BASE/admin/$ORACLE_SID/bdump 에 쌓였었죠. 

(아마 8.0 때부터였던가.. 그랬었을 겁니다. 아마 ㅋ)

가끔 bug이나 resource 문제로 $ORACLE_HOME/rdbms/log에 생기기도 했고요. 


Oracle 11g에서는 이 구조가 좀 바뀌었습니다. $ORACLE_BASE 밑에 diag란 directory 밑에 쪼르륵 달려있습니다. 


$ORACLE_BASE/diag/rdbms/'DATABASE NAME'/$ORACLE_SID/trace


이렇게 구조가 달라진 이유는 아마 metalink.oracle.com에서 support.oracle.com으로의 변화와 OCM (oracle configuration management) 때문이지 않을까 싶습니다. 즉, database의 특정 환경, event 들을 OCM을 통해 support.oracle.com에서 지원하려는 .. 뭐 그런 이유 이지 않을까 싶습니다. 


암튼 단순히 trace file과 alert log의 위치만 변경된 것은 아니죠. adrci라는 diag file 관리 tool이 만들어 졌습니다. 

이 tool을 이용해 현재 발생한 problem, incident 등을 쉽게 파악할 수 있으며, 기간이 오래된 trace file 등을 한방에 정리도 할 수 있습니다.

이러한 기능은 EM에서도 가능하고요. 


oracle 내에서 어떤 문제가 생겨 SR을 open해 분석을 진행할때 가장 귀찮은 게 관련 trace, log file을 취합해서 upload하는 겁니다. (저는 그래요.. ㅋ) adrci에서는 관련 trace, log file을 한꺼번에 취합해 주는 기능이 있는데, 이것이 IPS (incident packaging service) 입니다. 


구조가 바뀌고 "PROBLEM"과 "INCIDENT"라는 단어들이 나오는데, Problem은 특정한 문제 전체를, Incident는 문제의 발생 자체를 말합니다. 즉, ORA-1555가 10번 발생했다면 ORA-1555 1개의 문제에 10번의 incident가 발생한게 됩니다.


다음은 ADRCI에서 incident를 packaging 하는 방법입니다. 

그냥 보시면 아실만한 내용이라 별도의 설명은 생략하겠습니다. 


$ adrci


ADRCI: Release 11.1.0.7.0 - Production on Mon Mar 8 16:35:56 2010


Copyright (c) 1982, 2007, Oracle.  All rights reserved.


ADR base = "/oracle"

adrci> 

adrci> show incident


ADR Home = /oracle/diag/rdbms/test/TEST01:

*************************************************************************

INCIDENT_ID          PROBLEM_KEY                                                 CREATE_TIME                              

-------------------- ----------------------------------------------------------- ---------------------------------------- 

656910               ORA 600 [critical problem임]                                2010-01-29 11:31:45.635899 +09:00       

656909               ORA 600 [critical problem임]                                2010-01-29 11:19:30.662164 +09:00       

656478               ORA 7445 [critical problem임]                               2010-01-25 13:21:00.086171 +09:00       

656477               ORA 7445 [critical problem임]                               2010-01-25 13:16:54.434050 +09:00       

               ...

20 rows fetched


ADR Home = /oracle/diag/clients/user_oracle/host_2085451943_11:

*************************************************************************

INCIDENT_ID          PROBLEM_KEY                                                 CREATE_TIME                              

-------------------- ----------------------------------------------------------- ---------------------------------------- 

25                   oci 24550 [3]                                               2009-08-19 17:01:14.504278 +09:00       

17                   oci 24550 [3]                                               2009-08-19 16:59:56.250301 +09:00       

9                    oci 24550 [3]                                               2009-06-18 08:09:28.329766 +09:00       

1                    oci 24550 [3]                                               2009-06-18 08:07:58.791738 +09:00       

4 rows fetched


adrci> show homepath

ADR Homes: 

diag/rdbms/test/TEST01

diag/clients/user_oracle/host_2085451943_11

diag/clients/user_precise/host_2085451943_11

diag/clients/user_norad/host_2085451943_11

diag/tnslsnr/TEST01/test_TEST01

diag/tnslsnr/TEST01/listener_TEST01

diag/tnslsnr/TEST01/listener_TEST01

diag/tnslsnr/TEST01/listener

adrci> set homepath diag/rdbms/test/TEST01

adrci> ips create package incident 656910

Created package 1 based on incident id 656910, correlation level typical

adrci>

adrci> IPS GENERATE PACKAGE 1 in /oracle/diag

Generated package 1 in file /oracle/diag/ORA600critical problem임_20100308163713_COM_1.zip, mode complete

adrci> exit

$ls -altr

total 12744

-rw-r--r--   1 oracle     dba        6456404 Mar  8 16:39 ORA600critical problem임_20100308163713_COM_1.zip


참고: 

Note.738732.1 ADR How to Package Diagnostic Information in 11g

728x90
728x90

Question

MustGather information for problems with down dbspaces/chunks. Gathering this information before calling IBM® support helps familiarize you with the troubleshooting process and saves you time.

Answer

Gathering general information

For IBM® Informix® products, gather the following information for any problem:

MustGather: General Information to collect for Informix Family product problems


Down DBSpace / Chunk information 


Processes to run

Read the operating system man pages and IDS documentation for usage and other information about the following commands, if necessary. Run the following commands and collect the output:


Files to collect

This section lists files to collect which are normally (or optimally) analyzed for this problem.


Submitting information to IBM Support 

Once you have collected your information, you can begin Problem Determination through the product Support web page, or simply submit the diagnostic information to IBM support.

You can submit files using one of following methods to help speed problem diagnosis:

See the Related information article, 
Submitting diagnostic information to IBM Technical Support for problem determination

http://www-01.ibm.com/support/docview.wss?uid=swg21270737

728x90
728x90

리눅스에서 실시간으로 로그를 확인해야 할때가 있는데 그럴 경우 전 아래의 명령어를 실행합니다.

명령어 : tail -f access.log
실행결과 : 118.34.220.226 - -     [07/Apr/2010:14:54:42 +0900] "POST /bbs/delete_all.php HTTP/1.0" 200 121 "http://xxxx.co.kr/xxxx/xxx/xxxx/xxxx/xxx/xxx.jsp" "Mozilla/4.0 (compatible; MSIE 7.0; Windows NT 5.1; Mozilla/4.0 (compatible; MSIE 6.0; Windows NT 5.1; SV1) ; EmbeddedWB 14.52 from: http://www.xxxxxcom/ EmbeddedWB 14.52; .NET CLR 1.1.4322; InfoPath.2)"

실시간으로 매우 많은 양이 로그에 기록되면서 보여주는데 정말 정신 없습니다-_-;

그래서 awk 명령어도 같이 써줍니다.
awk에 대해선 자세히 모르지만 간단히 설명 드리자면 위의 길고 알아보기 힘든 로그를 필요한 부분만 잘라서 보여주는 기능입니다.

명령어 : tail -f access.log | awk -f" " '{ print $1" : "$6" : "$7}'
실행결과 : 118.34.220.226 : "POST : /bbs/delete_all.php HTTP/1.0"

네 이렇게 깔끔하게 나옵니다. (설명 드릴 포인트에 큰 글씨체와 볼드를 먹였습니다.)
설명을 드리자면 tail -f access.log | awk -f" " '{ print $1" : "$6" : "$7}' 중 
tail -f access.log | awk -f" " '{ print $1" : "$6" : "$7}'  처럼 따옴표 안의 공백으로 구분합니다. 즉 위 가공전의 로그에 공백을 구분한다는거죠 
tail -f access.log | awk -f" " '{ print $1" : "$6" : "$7}' 로 공백 전의 문자를 찾습니다. 정규식 표현법과 비슷합니다.
$1일 경우 위 가공전 로그의 첮번째인 ip $2,$3일 경우 '-'하이픈, $4일경우 날짜인 '[07/Apr/2010:....'
이런식입니다.

마지막으로 tail -f access.log | awk -f" " '{ print $1" : "$6" : "$7}' 이부분은
118.34.220.226 : "POST : /bbs/delete_all.php HTTP/1.0" 이부분과 같습니다.

728x90

'*nix' 카테고리의 다른 글

sed 사용법  (0) 2010.06.01
vi 특정문자열 삭제  (0) 2010.06.01
awk 사용법  (0) 2010.05.17
[AIX] 한글 로케일  (0) 2010.01.20
nohup  (0) 2009.12.01
728x90

AWK

  1. awk는 직접 사용자로부터 입력을 받거나 아니면 지정한 파일을 가공하여 표준 출력한다
    표준 출력을 리다이렉션할 수 있다 
  2. 사용법
    • awk   [옵션]   '스크립트'   [-v 변수=값]   [파일(들)]
    • awk   [옵션]   -f  스크립트 파일   [-v 변수=값]   [파일(들)]
    • cf) 편집 스크립트 파일의 사용법
      • ed  : ed -s(script) sourcefile < scriptfile
      • sed :  sed -f(file) scriptfile sourcefile > outputfile
      • awk : awk -f(file) scriptfile sourcefile > outputfile
  3. 옵션
    • -Fc  :  field separator 지정
      • c는 필드 사이를 구분하는 구분자이다
      • 직접 지정하지 않으면 공백을 기준으로 한다
      • 시스템 변수 FS를 지정하는 것과 같은 효과를 지닌다
    • -v  변수 = 값
      • 스크립트를 실행하기 전에 미리 변수를 지정하여 준다
    • -f  스크립트 파일
      • 스크립트를 파일에서 가져온다  
      • -f 옵션을 여러번 사용하여 여러개의 스크립트 파일을 동시에 불러와 지정한 파일에 적용할 수 있다 
  4. 스크립트
    • 패턴 { 동작 }
      커맨드 라인에서는 패턴, 동작 전체를 단일 따옴표로 묶는다
      • 패턴만 있는 경우 : 패턴과 일치하는 레코드(라인)를 화면에 출력한다 
      • 동작만 있는 경우 : 모든 레코드(라인)가 동작의 대상이 된다
    • 패턴
      1. /정규표현식/
        sed가 지원하지 않는 +, ?, |, ( ) 등의 메타문자도 지원한다   또한
        ^, $를 각 필드의 처음과 끝을 의미하도록 사용할 수도 있다
      2. 비교연산
        숫자 기준, 알파벳 기준 모두 사용 가능하다 
      3. 패턴 매칭 연산
        ~  :  일치하는 부분을 나타낸다
        !~ :  일치하지 않는 부분을 나타낸다
      4. BEGIN
        첫 번째 레코드가 읽혀지기 전에 어떤 동작을 정의하여 사용하고 싶을 때 사용한다 
      5. END
        마지막 레코드가 모두 읽혀진 후 어떤 동작을 정의하여 실행하고 싶을 때 사용한다 
    • 동작
      • 동작은 모두 { }로 둘러싸야 한다
      • 예제
        • good이라는 문자열을 포함하는 모든 레코드를 출력할 때
          /good/
        • 각 레코드의 첫 번째 필드를 출력할 때
          { print $1 } 
        • good이라는 문자열을 포함하는 레코드의 첫 번째 필드를 출력할 때
          /good/ { print $1 } 
        • 두 개 이상의 필드를 가지는 레코드를 전부 출력할 때(비교연산)
          NF > 2
        • 한 라인(\n)을 필드로, 빈 라인("")을 레코드로 구분할 때
          BEGIN { FS = "\n" ;  RS = ""} 
        • 첫 번째 필드가 good와 일치하는 레코드에 대해 세 번째 필드를 먼저 출력하고 두 번째 필드를 나중에 출력하고 싶을 때
          $1 ~ /good/ { print  $3 ,  $2 }
        • good이라는 문자열이 몇 개나 들어가 있는지 계산하여 마지막 부분에서 출력하고 싶을 때
          /good/ { ++x }
          END { print x } 
        • 두 번째 필드를 모두 합하고 마지막 부분에서 두 번째 필드의 총합계를 출력하고 싶을 때
          { total += $2 }
          END { print "Total of $2: " ,  total } 
        • 레코드의 길이가 20자 이하인 것을 출력하고 싶을 때
          length($0) < 20 
        • 네 개의 필드를 가지며 good이라는 단어로 시작하는 모든 레코드를 출력하고 싶을 때
          NF == 4  &&  /^good/
        • 빈줄을 제외한 모든 줄을 화면에 출력한다
          NF > 0
  5. awk 시스템 변수

      FILENAME

      현재 파일명

      $0

      입력 레코드

      FS

      입력 필드 구분
      디폴트 :  공백 

      $n

      입력 레코드의 N번째 필드

      NF

      현재 레코드 필드 갯수

      ARGC

      커맨드 라인의 인자 갯수

      NR

      현재 레코드 번호

      ARGV

      커맨드 라인 인자를 포함하는 배열

      OFMT

      숫자에 대한 출력 포맷
      디폴트 :  %.6g 

      ENVIRON

      환경 변수들을 모아둔 관계형 배열

      OFS

      출력 필드 구분
      디폴트 :  빈줄 

      FNR

      NR과 동일
      단지 현재 파일에 적용된다는 점이 다름 

      ORS

      출력 레코드 구분
      디폴트 :  newline 

      RSTART

      지정한 매칭 연산을 만족하는 문자열의 맨 앞부분

      RS

      입력 레코드 구분
      디폴트 :  newline 

      RLENGTH

      지정한 매칭 연산을 만족하는 문자열의 길이

  6. awk 연산자

      산술 : =, +=, -=, *=, /=, %=

      조건 : ? :

      논리 : ||, &&, !

      패턴 : ~, !~

      비교 : <, <=, >, >=, !=,==

      증감 : ++, --

      필드참조 : $


  7. 제어문(C의 제어문과 같다)
    • break
    • continue
    • do {실행} while (조건)
    • exit
    • for (관계형 배열의 요소) {실행}
      펄의 foreach와 같다
    • if (조건) {실행} else {실행}
    • return
    • while
  8. awk 명령어
    • 문자열 연산
      • gsub(reg,s)
        입력 문자열의 전반에 걸쳐 정규표현식 r을 문자열 s로 대치한다
      • gsub(reg,s1,s2)
        문자열 s2에서 정규표현식 r을 s1으로 대치한다 
      • index(s1,s2)
        s1에서 s2의 위치를 넘겨준다  만약 없다면 0을 넘겨준다 
      • length(arg)
        인자의 길이를 넘겨준다 
      • match(s,r)
        문자열 s에서 정규표현식 r과 매칭되는 부분의 위치를 넘겨준다 
      • split(string,array[,seperator])
        구분자를 기준으로(지정하지 않으면 공백 기준)해서 지정한 문자열을 배열로 만든다  배열[1],  배열[2], ....... 
      • sub(r,s),  sub(r,s1,s2)
        gsub과 동일하다
        단지 정규표현식과 일치하는 문자열이 여러개라도 처음 문자열만 대치된다
      • substr(s,m)
        문자열 s에서 m번째 위치에서 끝까지의 문자를 리턴한다 
      • substr(s,m,n) 
        문자열 s에서 m번째 위치에서 n번째까지의 문자를 리턴한다 
      • tolower(str)
      • toupper(str)
    • 수치 연산
      • atan2(x,y)
        y/x의 arctangent값을 라디안 단위로 넘겨준다 
      • cos(x)
      • exp(arg)
      • int(arg)
      • log(arg)
      • rand() 
        0과 1사이의 난수를 발생한다 
      • sin(x)
      • sqrt(arg)
      • srand(expr)
        인자를 가지고 난수를 발생한다
        인자가 주어지지 않으면 시간을 가지고 난수를 발생한다 
    • 입출력/프로세스
      • close(filename)
        지정한 파일을 닫는다 
      • close(cmd)
        지정한 명령어 파이프를 닫는다 
      • delete array[element]
        지정한 배열 요소를 지운다 
      • getline()
        다음 레코드를 읽어 들인다 
      • getline[variable] [< "filename"]
        파일에서 읽어들인다 
      • next 
        다음 레코드(라인)을 입력받는다
        getline()과 유사하지만 /패턴/동작을 새롭게 시작한다
        getline()은 다음 라인을 읽기만 한다 
      • print [args] [> "filename"]
        인자를 출력한다 
      • printf "format" [,expressions] [> "filename"] 
        형식에 맞춰 출력한다 
      • sprintf (format [,expressions]) 
        printf와 마찬가지로 사용하는데 값을 리턴하기만 하고 출력은 하지 않는다 
      • system(command) 
        시스템 내부 명령어를 실행한다 
  9. 간단한 예
    • awk  ' BEGIN { for (i = 1;i<=7,i++)  print int(101*rand()) }'
      화면에 1이상 100이하의 난수 일곱 개를 출력한다
    • ls -l  file1  file2  file3  | awk  ' { x += $5 } ;  END { print "Total bytes :  " x } '
      파일들의 크기를 모두 합하여 총 바이트 수를 표시한다
    • awk  ' END { print NR } ' filename
      지정한 파일의 라인이 몇 개인지를 표시한다
    • awk  ' NR % 2 == 0 ' 
      지정한 파일의 짝수번째의 라인만을 출력해 준다 

참고서적 :  sed & awk, Dale Daugherty, O'reilly

cafe.naver.com/itpeople

728x90

'*nix' 카테고리의 다른 글

sed 사용법  (0) 2010.06.01
vi 특정문자열 삭제  (0) 2010.06.01
로그파일 가공하기  (0) 2010.05.17
[AIX] 한글 로케일  (0) 2010.01.20
nohup  (0) 2009.12.01
728x90
1. onstat -d 명령으로 dbspace 확인
$ onstat –d
 
Informix Dynamic Server Version 7.31.UD1    -- on-Line -- Up 16 days 05:57:23 -- 163008 Kbytes
 
Dbspaces
address  number   flags    fchunk   nchunk  flags    owner    name
1219a150 1        2        1        1        M        informix rootdbs
1219ad00 2        1        2        4        N        informix datadbs
1219adc0 3        1        5        1        N        informix datadbs2
1219ae80 4        1        7        3        N        informix datadbs3
4 active, 2047 maximum
 
Chunks
address  chk/dbs offset   size     free     bpages   flags pathname
1219a210 1   1   50       1000000  748319            PO-   /opt/informix/DBS/root_chk01
1219a310 1   1   50       1000000  0                 MO-   /opt/informix/DBS/mroot_chk01
1219a500 2   2   50       1000000  3                 PO-   /opt/informix/DBS/datadbs_chk01
1219a600 3   2   50       1000000  51                PO-   /opt/informix/DBS/datadbs_chk02
1219a700 4   2   50       1000000  957               PO-   /opt/informix/DBS/datadbs_chk03
1219a800 5   3   50       1000000  999947            PO-   /opt/informix/DBS/datadbs2_chk01
1219a900 6   2   50       1000000  615765            PO-   /opt/informix/DBS/datadbs_chk04
1219aa00 7   4   50       1000000  99947             PO-   /opt/informix/DBS/datadbs3_chk01
1219ab00 8   4   50       1000000  0                 PD-   /opt/informix/DBS/datadbs3_chk02
1219ac00 9   4   50       1000000  0                 PD-   /opt/informix/DBS/datadbs3_chk03
9 active, 2047 maximum
2. flags 두번째 값 확인. 'D'로 표시된 경우 Chunk Down 을 의미함.
3. Chunk가 raw-device 인지, cooked-file 인지 확인.
4. symbolic link 및 chunk에 문제가 없는지 dd 명령어등으로 액세스 가능 여부 확인.
5. mirror chunk 가 존재한다면 onspaces 명령으로 온라인 전환 가능.
onspaces -s db_acct -p /dev/mirror_chk1 -o 0 -O
6. 위의 경우로 해결할 수 없을 때는 onall 등의 유틸리티로 복구


* onall은 IBM에서 제공하는 인포믹스 복구용 프로그램입니다.

최신 또는 11 버전 이상의 버전에 대해서는 별도로 제공되지 않으며 IBM의 기술지원을 받아야 합니다.


* 11 버전 이상에서는 ASTOOL(Advanced Support tools)을 사용해 인포믹스 복구를 시도할 수 있습니다.다만 사용하기 위해서는 별도의 key generator가 필요하며 IBM에서만 제공됩니다.

728x90
728x90

Could not come up with a better title for this post. After reading some of our blog posts, one of our readers asked the question – “Why do you always make use of a “SELECT 1″ rather than a “SELECT *” when using an EXISTS or a NOT EXISTS clause”.

The answer is that during the query plan stages, the * is expanded to bind with the list of columns. And then since the semantics of the query is such (EXISTS or NOT EXISTS), since it does not need any of those columns, it will remove all of them. Using a SELECT 1, avoids having to look at any of the meta-data that is not even needed for that table during query compilation time.

Please do NOTE that at runtime BOTH of them will have the same plans. We can quickly check that with an example (using SQL Server Syntax):

CREATE TABLE TBL1 (COL1 INT IDENTITY PRIMARY KEY, COL2 INT)
GO
CREATE TABLE TBL2 (COL3 INT IDENTITY PRIMARY KEY, COL4 INT, COL5 INT, COL6 INT, COL7 INT, COL8 INT, COL9 INT, COL10 INT, CONSTRAINT FK_TBL2_TO_TBL1 FOREIGN KEY (COL4) REFERENCES TBL1(COL1))
GO

CREATE INDEX TBL2_IND_1 on TBL2 (COL4)
GO

SET NOCOUNT on
GO
DECLARE @I INT, @J INT
SELECT @I = 1, @J = 1000
WHILE (@I <= @J)
BEGIN
INSERT INTO TBL1 (COL2) VALUES (@I)

IF @I%7 = 0
INSERT INTO TBL2 (COL4, COL5) VALUES (@I, @I + 10)

SET @I = @I + 1
END
GO

SET SHOWPLAN_TEXT OFF
GO

SELECT * FROM TBL1 AS A
WHERE EXISTS (SELECT * FROM TBL2 WHERE COL4 = A.COL1)

———————————————————————————————————————————————————————–
|–Merge Join(Left Semi Join, MERGE:([A].[COL1])=([master].[dbo].[TBL2].[COL4]), RESIDUAL:([master].[dbo].[TBL2].[COL4]=[master].[dbo].[TBL1].[COL1] as [A].[COL1]))
|–Clustered Index Scan(OBJECT:([master].[dbo].[TBL1].[PK__TBL1__17E28260] AS [A]), ORDERED FORWARD)
|–Index Scan(OBJECT:([master].[dbo].[TBL2].[TBL2_IND_1]), ORDERED FORWARD)

SET SHOWPLAN_TEXT OFF
GO

DBCC FREEPROCCACHE
GO

SET SHOWPLAN_TEXT on
GO

SELECT * FROM TBL1 AS A
WHERE EXISTS (SELECT 1 FROM TBL2 WHERE COL4 = A.COL1)

StmtText
———————————————————————————————————————————————————————–
|–Merge Join(Left Semi Join, MERGE:([A].[COL1])=([master].[dbo].[TBL2].[COL4]), RESIDUAL:([master].[dbo].[TBL2].[COL4]=[master].[dbo].[TBL1].[COL1] as [A].[COL1]))
|–Clustered Index Scan(OBJECT:([master].[dbo].[TBL1].[PK__TBL1__17E28260] AS [A]), ORDERED FORWARD)
|–Index Scan(OBJECT:([master].[dbo].[TBL2].[TBL2_IND_1]), ORDERED FORWARD)

As you can see from above, the execution plan at runtime are exactly the same regardless of whether a “SELECT 1″ is used or a “SELECT *” is used. We use SELECT 1 because of the reason mentioned in the start of this post.

728x90

'sql server' 카테고리의 다른 글

사용자와 스키마 분리(SQL Server 2005)  (0) 2011.08.31
통계 업데이트하기  (0) 2010.04.22

+ Recent posts